# Custom Command Development
This page aims to guide developers on how to develop custom command add-ons.
Please note:
This chapter serves as an introductory tutorial, primarily to familiarize developers with the basic knowledge and development process of custom commands.
For information on how to develop AddOn packages with specific function for specific scenarios, please refer to the subsequent case chapters.
# About Custom Commands
# What are Custom Commands
Custom commands refer to commands that are not in the JAKA App commands directory, but in compliance with JAKA script rules, and developed by developers according to their own needs.
# Purpose of Custom Commands
As mentioned in the introduction, when a robot's end effector is connected to a new third-party tool, or when it is used to operate specific processes in a specific work scenario, it often requires writing complex commands and setting numerous parameters in the JAKA App programming interface. This step is complex and not easily reusable, so it is necessary to encapsulate these complex, diverse commands and parameters into a single, straightforward, easy-to-use command block to save time and improve efficiency.
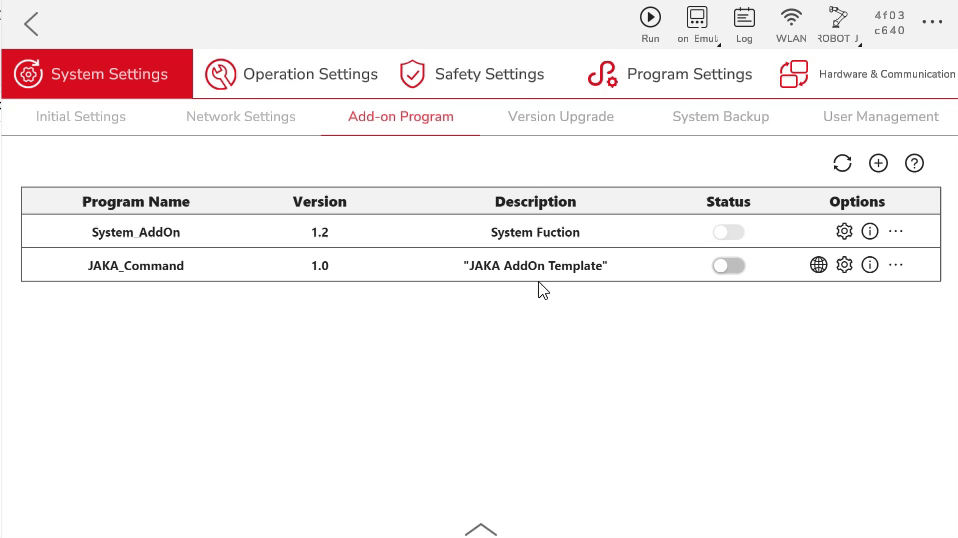
# Creating an AddOn Custom Command Package
In this demonstration, we will create a custom command add-on, the function of which is to display the input and selected content from the instruction block in the App log.
Note:
In the following content, "JAKA_Command" refers to the package name of the AddOn custom command we are about to create.
# Step One: Create an AddOn Folder
First, we need to create a basic AddOn folder, which should contain a .ini format configuration file and a json file for data storage.
You can create a new folder, or you can modify the AddOn template under the "Template" (opens new window) directory in the AddOn development package repository.
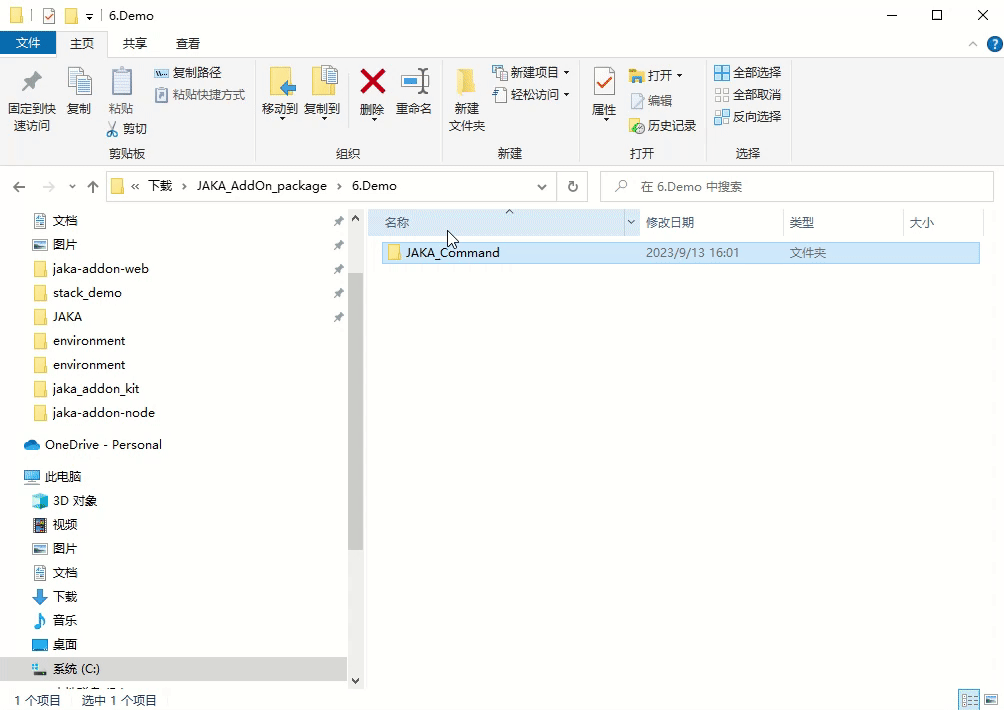
Directory Structure
|——JAKA_Command
|——AddOn.json
|——JAKA_Command_config.ini
- AddOn.json
The json file can be empty. Data will be generated and written in the subsequent steps. - JAKA_Command_config.ini
The content of the configuration file 👈 is as follows:[AddOnInfo] convention = 3.0 name = JAKA_Command description = "Output information in the log" version = 1.0 type = 1 portal = 10006 url = http://localhost/myAddOnUi languagetype = node-red service = AddOn.json serviceenabled = 1
Tip:
Refer to AddOnConfigurationFileSpecification [Click] 👈for details.
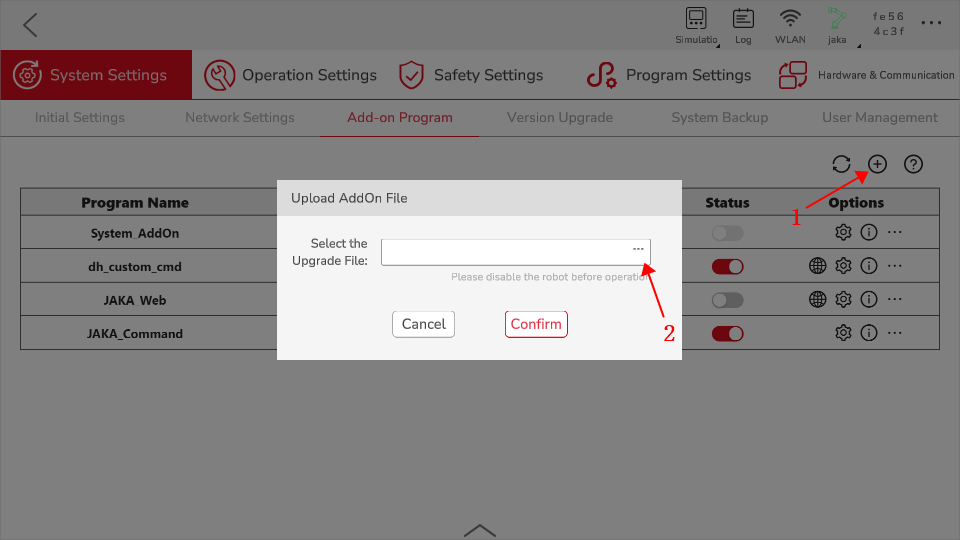
# Step Two: Package & Upload
Next, we will package the folder created in Step One and upload it to the controller. The required format for packaging is .tar.gz.
In Windows, you can use tools like 7z for secondary compression.
In the App, use the attached management page to upload the add-on.
Summary
Up to now, we have fully prepared for the development of AddOn package. An AddOn package of standard format has been made and send to the controller.
Now, let's develop the specific function of AddOn package.
# Step Three: Develop Custom Commands
- Run the add-on and check the port number it is running on.
- Open a browser, enter the robot's IP address and port number in the address bar,
IP:Portal, to access the developer interface.
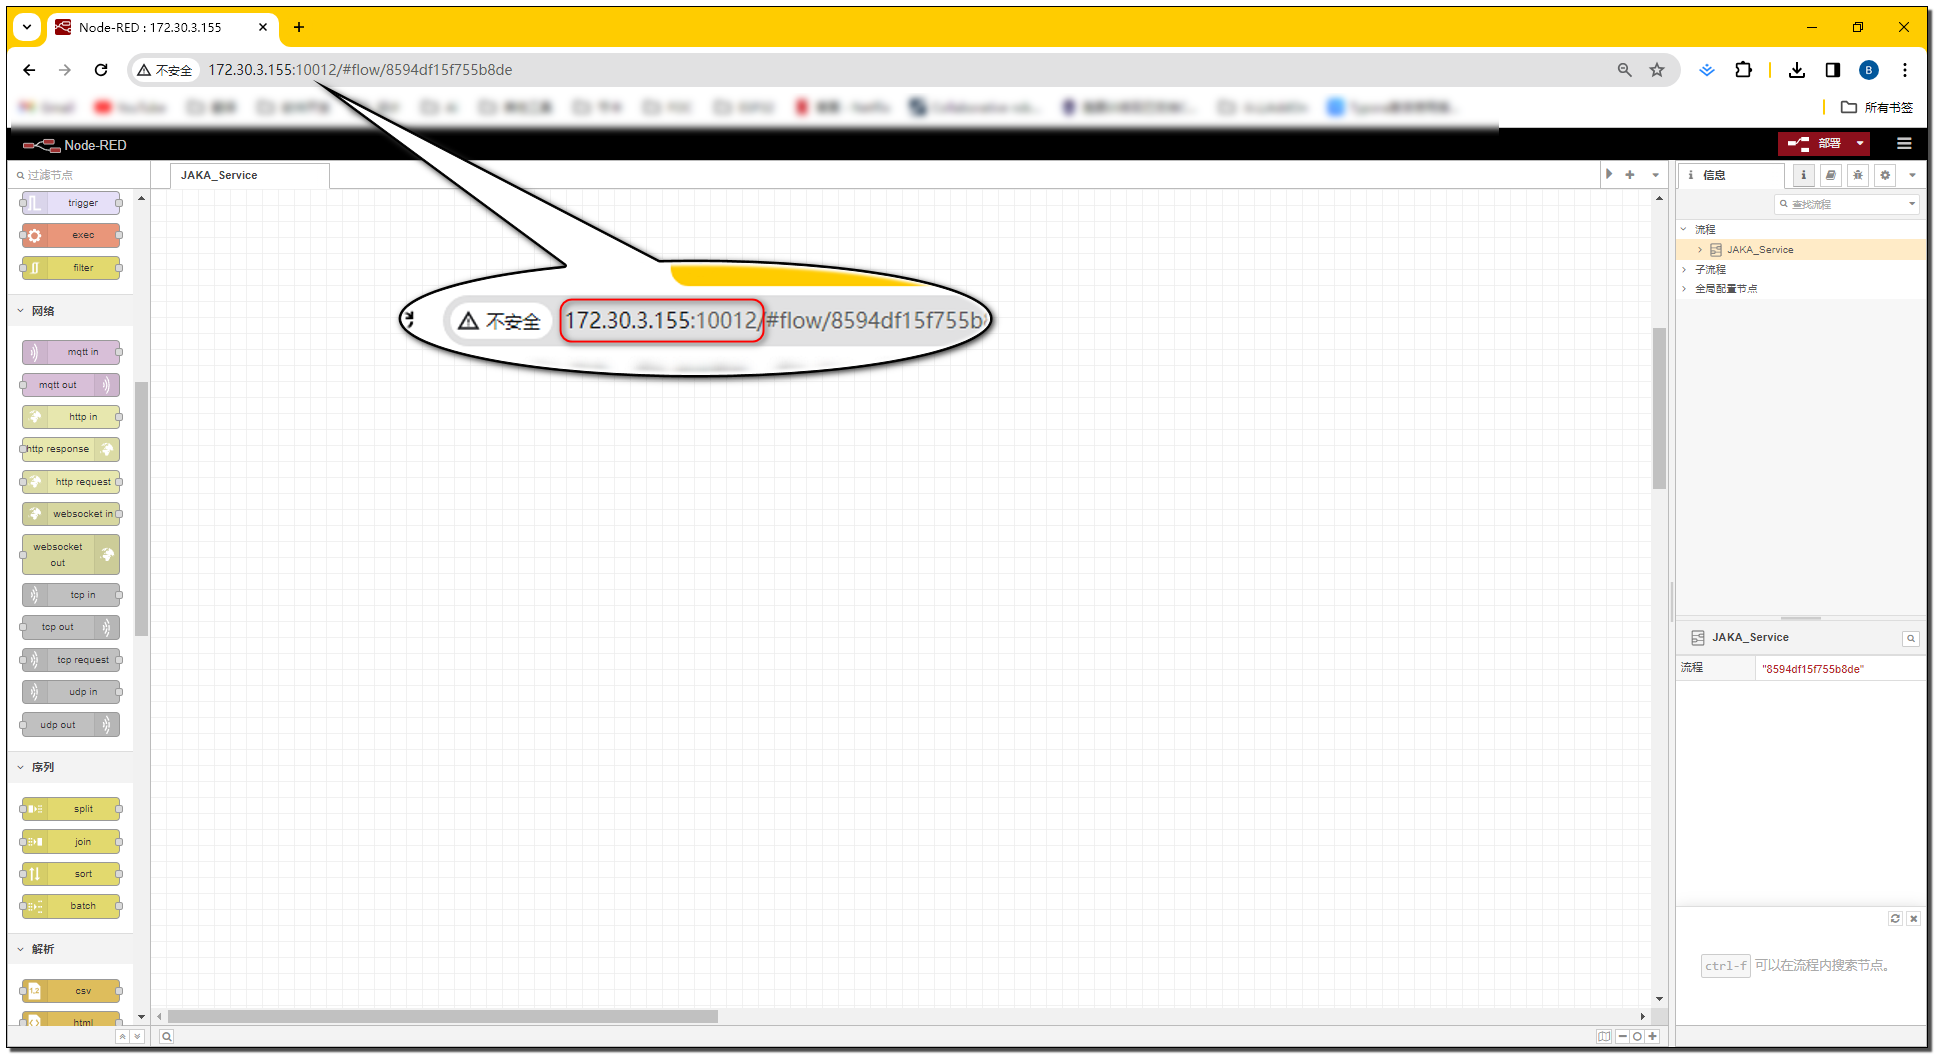
Summary
When the AddOn is running, the controller would start a node-red that is based on the AddOn.json file in AddOn package as an example. We can have access to this node-red through the robot's IP address and the current port number of the AddOn.
Please notice:
AddOn has more than one running port, which would be distributed by the system based on the real time situations. Therefore, the user should check the current port number of the AddOn before using it.
If the user needs to use this port number when programming in node-red, it is suggested to check it the AddOn's configuration file xxx_config.ini.
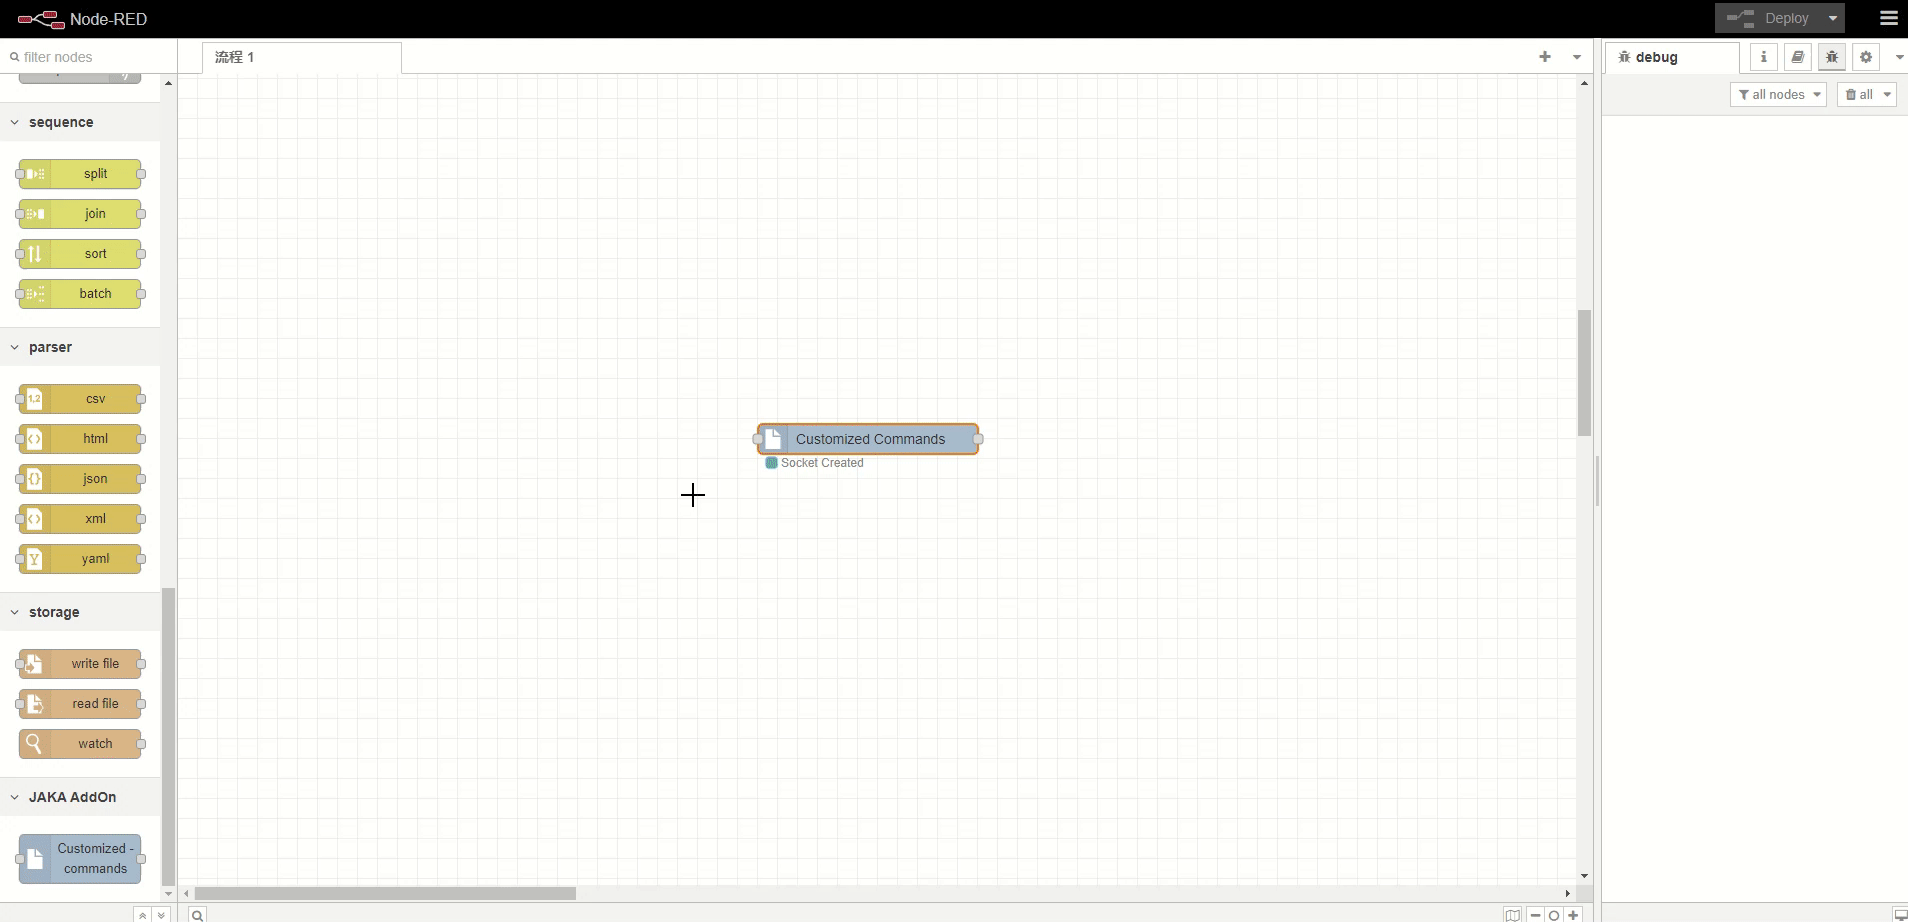
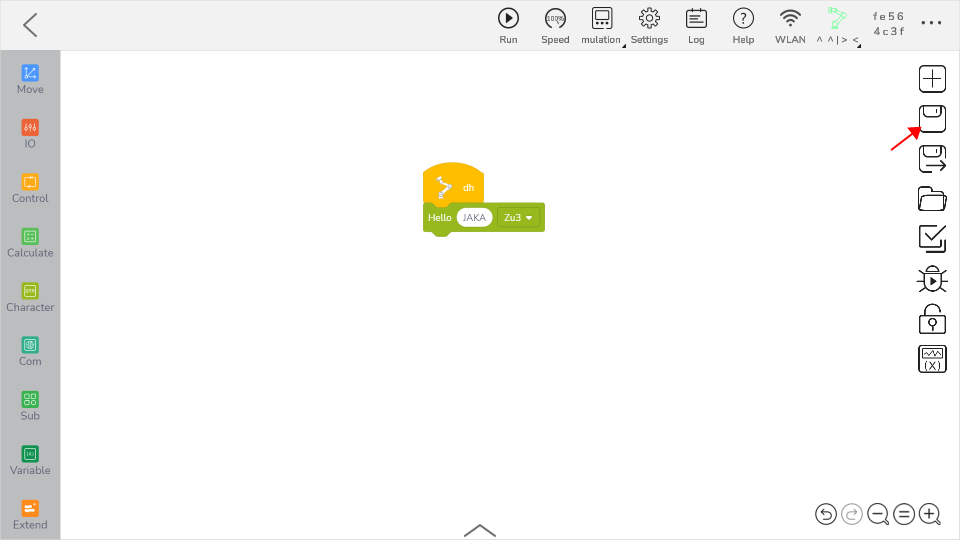
- In the left toolbar, find the
Custom Commandsnode, drag it to the middle, and click "Deploy".
Double-click the Custom Commands node to open the command block generation tool page.
TIP
The user guide of Custom Command node can be viewed in the HELP interface in the upper right corner of the webpage.
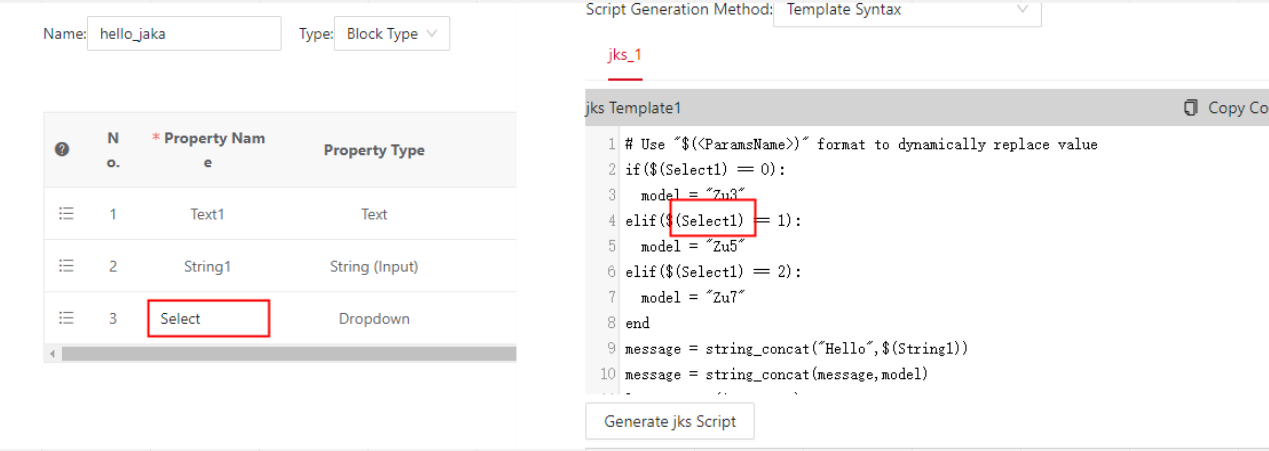
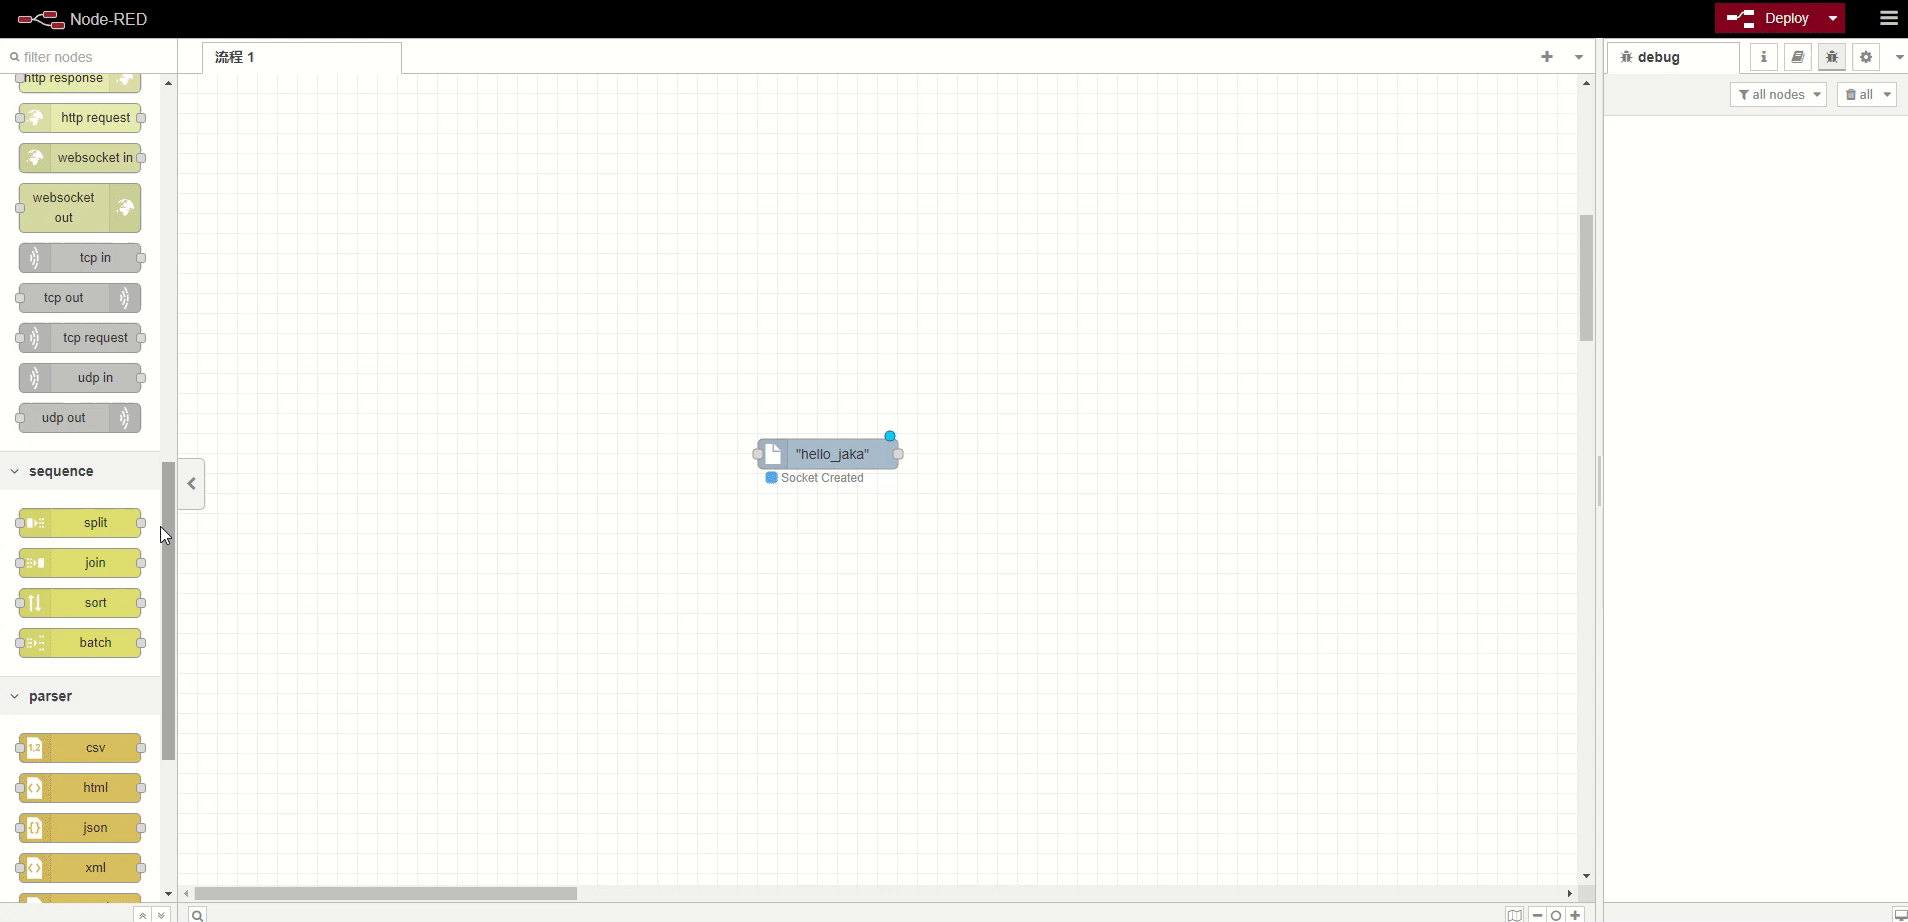
- In the Basic Configuration page, define the style and attributes of the command block. In this case, use the attributes provided by the example page without making any changes. Change the instruction block name to hello_jaka and set the color to green. In the Script Generation page, define the behavior of the command block. In this case, use the script provided by the example page without making any changes.
TIP
The script language used here is JAKA Script. For detailed usage, please refer to JAKAScriptManual👈.
Summary
Up to now, we have a clear definition of custom commands, including its format, property, script, etc. The custom command we made can already be found in the App, but unable to be used. In the following steps, we need to help the App have access to the custom command's script by completing the development in node-red.
- Use the
http inandhttp responsenodes to complete the flow.
Please Note:
The URL of the http in node must be consistent with the name of the custom command block.
Tip
It is fair to regard the custom command as a kind of custom service, which
# Step Four: Run the Developed Add-on
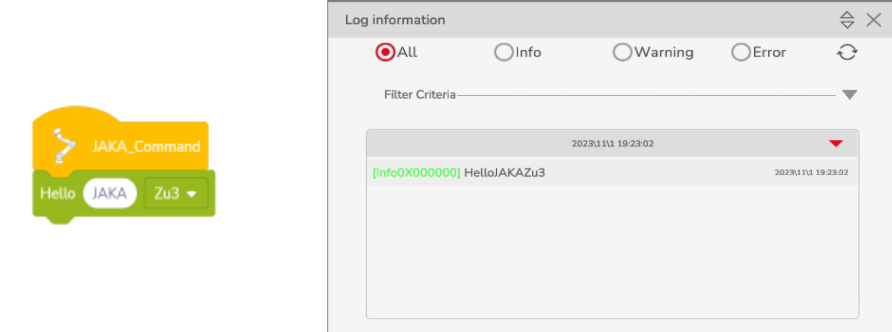
After deploying the flow in node-red, click the refresh button on the attached programs page. You will find the newly created command block in the extended commands of the programming page in the App.
TIP
🎉Congratulations! You have completed a whole procedure of custom command development. Next, let's find out how to debug and handle some FAQ.
# Debugging
How to Check if the Communication Parameters are Correct?
TIP
It is a common debugging method to use debug node in node-red.
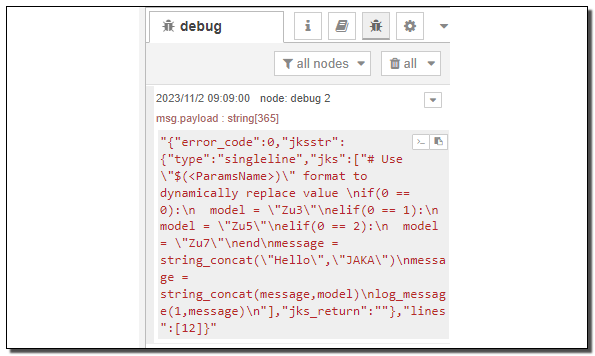
Use the debug node in node-red for debugging. It can debug the parameters sent by the instruction block when saving and the returned JKS to see if they are correct.
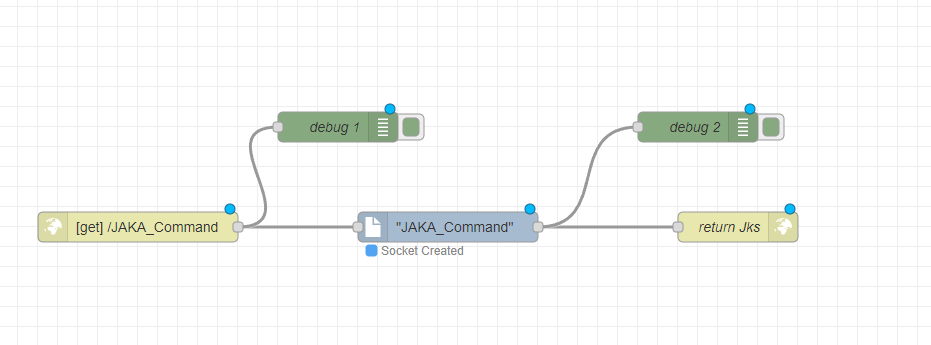
When saving or running the program, the App initiates a GET request.
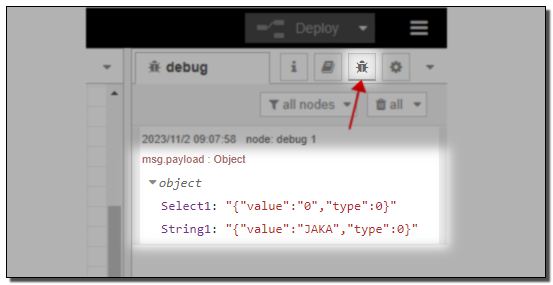
At this point, debug1 can capture the parameters transmitted in the request. The keys of this object are the names of the attributes on the instruction block, and the values are the specific content of the attributes, including the attribute value and type.
Using the content below as an example, "Select1" is the name of the dropdown box attribute defined, "value" is the attribute value, and 0 indicates that the first option in the dropdown box is selected at this time.
"type" is the type of parameter entered in the instruction block, which is only meaningful for input box type attributes. 0 indicates that the value entered in the input box is manually entered, and 1 indicates that the input box contains content of variable type (data types of instruction blocks such as system variables, calculation results, etc.).
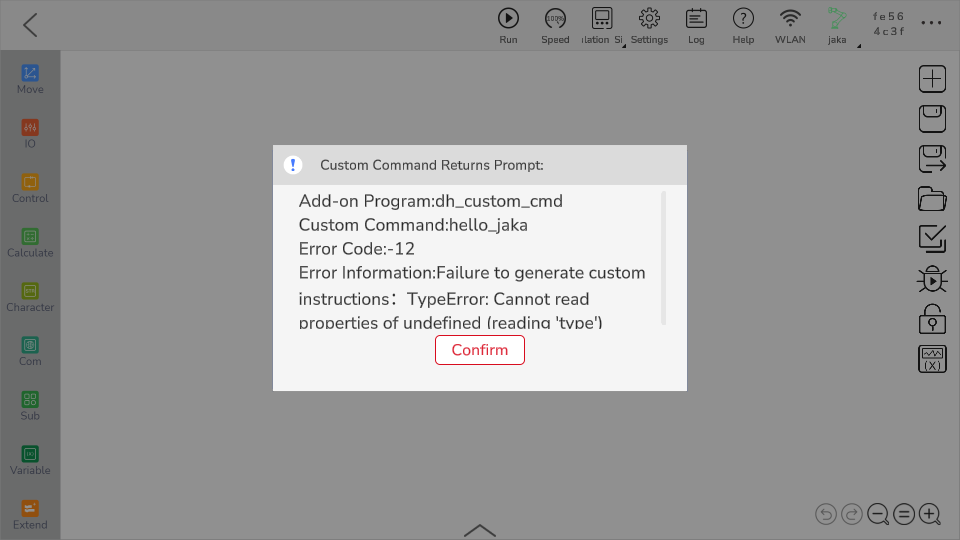
The information printed in debug2 includes the object of the JKS script generated this time.
Among them, error_code is the error code for generating the JKS. 0 means normal generation, and -12 means internal error. When this error code is not equal to 0, the App will pop up an error message with the corresponding error code and error information. Here, we only need to pay attention to the "jks" attribute, which is the actual generated JKS script.
Simulate Script Generation
- On the script generation page, after entering parameters in the left instruction block, click "Generate JKS Script" to simulate the generation of a script. View the simulated generated code in the code window below.
Please Note:
Clicking the "Generate JKS Script" button only displays the simulated generated script in the code window below, and has no other practical effect.
# FAQ
During the development process, you may encounter the following issues. Please refer to the following text for specific situations and corresponding debugging methods.
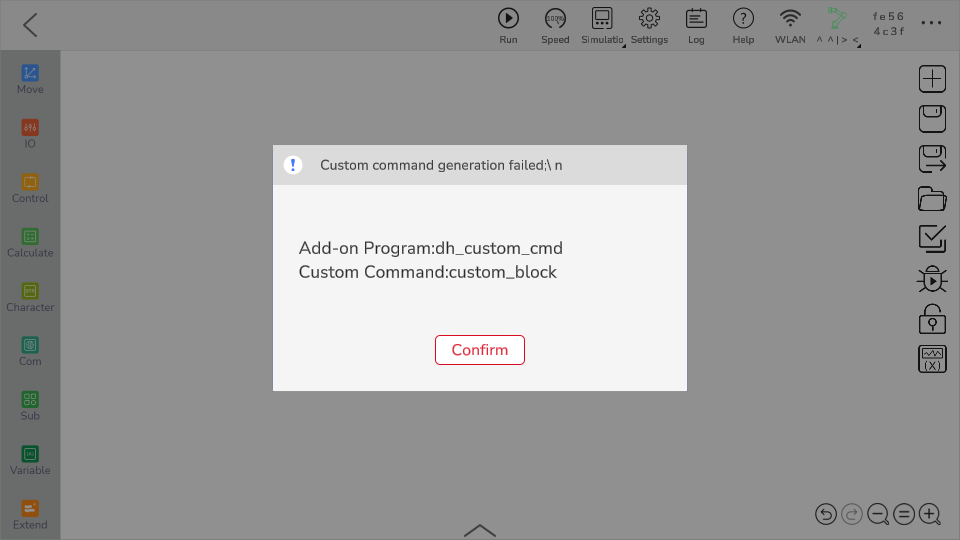
Custom Command Generation Failed
When using a custom command block in the App programming page, clicking save may result in an error message "Custom command generation failed". This may be caused by the following reasons.
Add-on is not running
Solution: Find the add-on in the attached programs page and click the run button to start the add-on.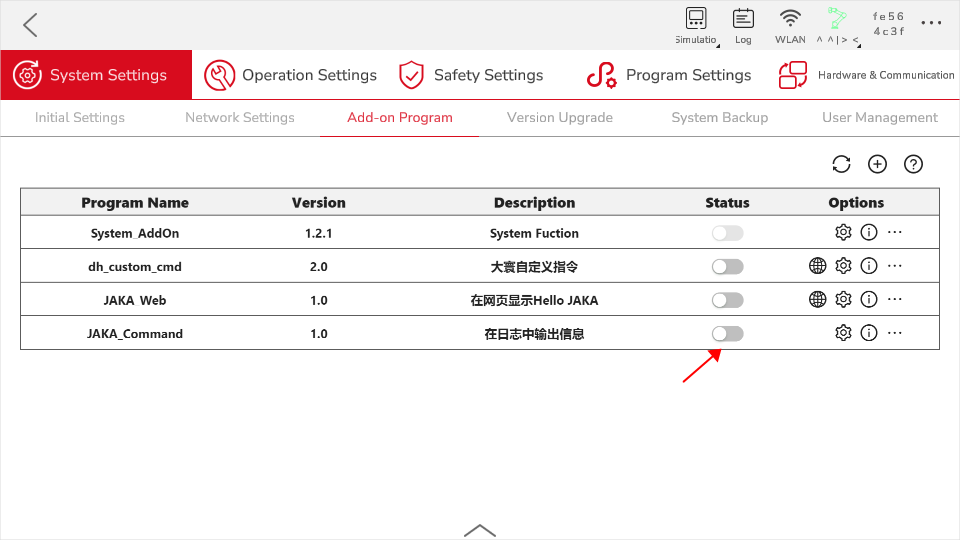
The URL in the
http innode in node-red does not match the name of the instruction block
Solution: Ensure that the URL matches the name of the instruction block.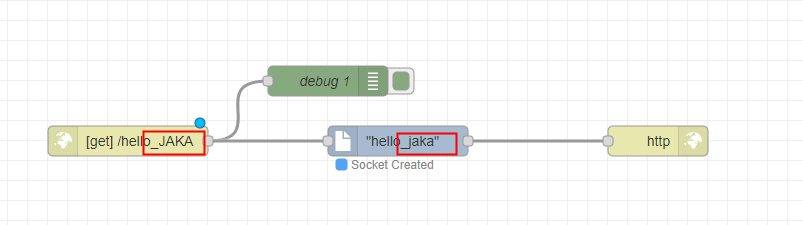
Internal Server Error
When encountering an internal server error, it is generally due to a timeout in receiving the HTTP request in the App.
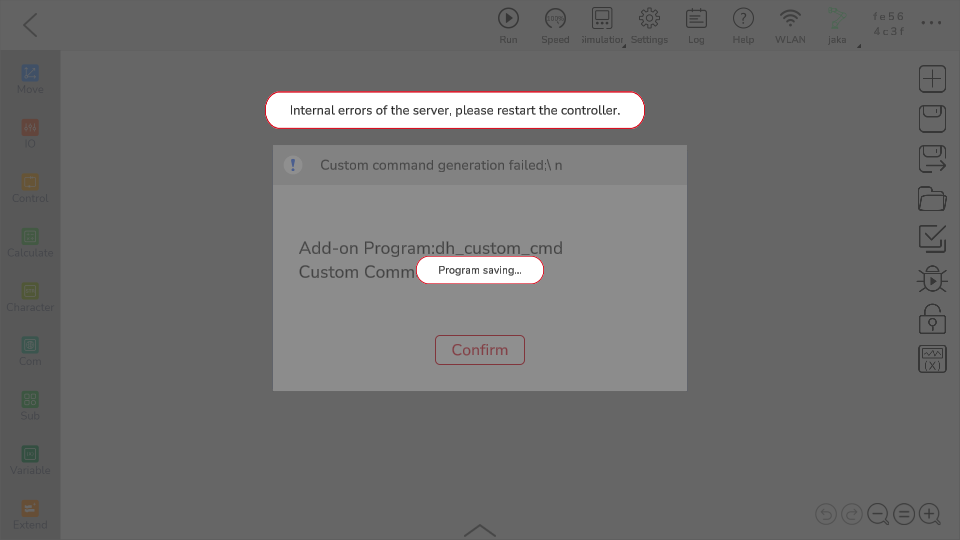
Solution: Check if the http in node in node-red is correctly connected to the http response node. After connecting, restart the add-on on the App.
WARNING
- Currently, even after reconnecting, you still need to restart the AddOn service to save the program. This is caused by some unknown bugs internally and will be fixed in future versions.
- The description in the error message that instructs to restart the controller is incorrect. Restarting the add-on is sufficient.
Attribute Matching Failed
Solution: Check if the attribute names used in the custom command in node-red match those used in the script definition.